Thursday, April 26, 2007

Thursday 26th April

Well the great news is I have a date to which I can return to work! It's just such a relief, its been so long since that damn fall and whoever would have believed that a relatively simple fall could cause so much trouble?

And.. I had my first physio session a couple of days ago. My, but it's like being given an overly-thorough going over by someone you know doesn't intend to harm, but - well, heck it's physio therapy isn't it? You expect it to hurt. I was so, so tired afterwards as well! And all because I was trying to force my knee to lie flat against a mattrass - you'd think I'd tried to run the marathon. However, hopefully the end will result in my being able to sprint for the occasional dash out of the way of oncoming traffic - right now, I still feel like every time I cross a road, I'm taking my life in my hands. I really did have to dash the other day - but the rather amazing thing was that for the first time in about three months I was actually able to. I definitely trotted. And I made it to the other side with no real side effects - twinges for sure, but since I'd been out walking, I was nicely warmed up for a quick dash. Still, for all that, I did rather feel that if I have to do it again, I'd rather not be doing it with a ten ton lorry bearing down on me!

What else have I been up to? Well, been taking advantage of the high dollar for a start. I've been buying a few beads - actually I have to do a little buying now, and then none for a good month or so. I've been using the old noggin and buying in America. Via the web, you understand, I could no more afford to go to America than fly, and my, but they do have some nice websites. Several that I went to specialised in vintage beads, and oh but you could spend a fortune on them! Some to die for vintage Japanese beads, and some enamel work that I think must be turn of the last but one century (i.e. the 19th!) that must be Eastern European. Way out of my price range of course, but one can dream..
As it is, the common or garden Czech druk is pretty nearly always my bead of choice. It's just a plain round glass bead, but the colours you can get in America are fabulous. How come you never see such glorious colours on the European websites is what I want to know.

Anyhow that is my controversy of the day. I'm in way too much of a good mood to have any other seriously dour bones to pick, despite the ghastliness of what goes on around us in the world. Let the world take care of itself for a day or two - so long as it doesn't explode on top of me before I get back to work is all that counts right now.

Thursday, April 19, 2007

Blue Blog Bangle!


Just to let you know, that I've put this bangle - the one made in the project below - on sale on Ebay. It'll go live later this evening - Thursday 19th April. This of course, is all assuming that the Ebay powers that be don't rule the blog tag on the description as being contrary to their rules and regs!

To look at the auction, use the link over on the right to go to my Ebay shop, and look at the listing for "Blue Blog Bangle"! Good luck!
Ebay Item number: 230119160521


Tuesday, April 17, 2007

Wire Twist Bangle Project - Ideal for beginners!

Want to make your own jewellery? Don't fancy knitting, or haven't got any pliers, and don't want to invest in anything expensive before you know whether it's for you? Then this is the place to start, because with this lovely bangle, you don't need any expensive equipment.

What you do need is to go to a craft shop (they're all over the place now, or go to the internet) and buy some wire. You'll need a thick guage and a roll of thin - for the thin, I suggest buying one of the lovely enamelled wires that come on spools nowadays, but you're looking for something that's as thin as cotton. Don't try this with anything thicker, or you'll find your fingers will hurt!

You'll also need beads. As many small beads as you want to put on here, but not less than 75 at 6 -4 mm diametre, or a few hundred 'seed beads'. These are the tiny beads that come in tubes from most good habadashery shops. I like to have a good random mix of different types of bead.
Now - first step.


Cut a length of the thicker wire. The length that you're looking for is big enough to go over your hand, with an inch or so longer on each side, because you're going to twist the wire together to make a continuous loop. I've used my pliers here, but you can use the kitchen scissors - it cuts very easily, but DO NOT use good dressmaking scissors!


Twist the open ends together. The sort of wire that you're using should twist easily, and if you twist in different directions for each loose end, it'll hold together. Don't worry if you've left a few loopy turns - that's good to thread the beading wires through for a secure anchor, and you'll be covering the whole thing in thick wrappings of twisted wire, and beads, so it won't show.

Put the 'armature' - this loop of wire, aside for the time being. Get out your spool of thin wire, and thread the beads onto the wire. I like to make multiple strands of different types of bead - you can wrap as many of these beaded strands onto the bracelet as you want.


Remember when you're threading your beads, that the one you put on first will be the last bead you twist - on that thread. The last bead you thread on, will be the first bead that you twist.


Move the last bead back up the thread and make a 'loop' of wire, with the bead at the end - just like in the photo here. You're looking to get a good 'U' shape. Grasp the bead between finger and thumb, securing both wires between the fingers and thumb of your other hand. Twist. The bead will soon be at the end of a little stalk of twisted wire -


Continue along in the same manner for all the beads. It doesn't matter in the least if the little stalks are all on the one side of the wire, or they go either side - just so long as they are firmly, but not tightly twisted. If they untwist themselves, they are very easy to retwist, even when you're wrapping them around the bracelet.

You need to make the stalks of different lengths. You don't need to measure the amount of wire your using to make the stalks - because the stalks with the beads are wound into the bracelet (as you'll see) it's actually quite important to make them of different lengths - but I wouldn't make any shorter than half an inch. (Or a centimetre.)


You might like to twist up two, or three beads together - they make interesting and beautiful shapes!


You end up with a long string of wire, with little stalks full of beads! When you've finished your first, make sure to put it somewhere safe, and stretched out lengthwise. Do not feel tempted to wrap them around your hand to pop it somewhere convenient until you've finished - these are little devils for tangling, and you'll never unravel them. Store them stretched out until you need them to start wrapping.

Make a good number of the strings - for a reasonably fat bracelet, such as this one I've just made, you'll need about five to six lengths of approximately two to three feet.


Now, when you're happy you've enough strings to start, you need to attach a loose end to your armature - the round loop of thicker wire that we started with. It's very simple - loop the loose end through the bracelet, grasp it and the string of beaded wire, and twist them together. If you put a finger in to the loop, you'll be able to twizzle it round very swiftly and smoothly. You'll know when your finished, because you won't have a loose end anymore - just one smooth twist looped around the bracelet, and ending at your first stalk.


Now twist the beaded string through the inside of the bangle, around and around. Don't worry about the little stalks at the moment, and don't attempt to do this so smoothly that ever part of the thicker wire is covered with immaculately ordered wire wrapping. At this point you're aiming for an even distribution of beaded stalks, and that the wire string is firmly wrapped around the bangle. Now, when I say firmly, I mean firmly and not overly tight. If you pull this wire too tightly, it will break - and if it does, then not too worry. Learn from the break that you over twisted, or pulled too hard, and adjust your 'tension', as they say, just like a piece of knitting! The broken bit is easily reattached, in exactly the same way that you started. You really can't damage this, and the very randomness of the piece prevents an error from being seen at all. It's up to you to be happy with what you're doing, and how it looks. This is your piece of creative crafting.


End your wrapping around the bangle by twisting the loose end into a stalk. Now turn to the stalks, and start wrapping them around the bangle, ending up with the bead close against the wire. Continue around, and then when complete, join in your next strand. I usually start off a new strand close to a bead, and wrap the long wire around the bead several times before I start moving off around the circle. You will find it helps to smooth the stalks down in the direction of which you're pulling them through the bangle - don't pull them through overhard now, because they often will get attached to the beads. Simply unhook them, and pull them through.


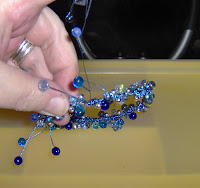
After you've put three or four strings on to the bangle, it's going to look something like this. Here, I'm wrapping stalks and beads around the bangle. Once you've got your second string on, you can start 'weaving' - that's twisting the beads around each other, so that you've got a tight little knot of beads that are firmly secured. Be careful when you've doing this, don't over do it, or you'll take the beads off. If this happens, don't panic - but you'll need to cover it with a new string of beads.

Have a good look at your bracelet at this point, and even it up. That means look at where there are fewer beads, and wrap a string into that area. You may need to make a further string or two at this point to even the bracelet - I often do, because I mis-judge where I'm putting them, or I like the look of a bunch that's developing and I want to add to it.


As you can see, this is a thin bit, and needs boosting.


So I'm wrapping a new string into it.


Just keep going until you're happy with the bracelet.


And here it is! I'm very pleased with it, and I'm sure you'll be with yours. I'll take a better photo of it a bit later today, and post it!

Monday, April 16, 2007

Monday 16th April

Hello All!


I thought I'd do a quick post before I shoot off to the Post Office - yes, another sale! I feel very pleased with how things are going, with my little business. I'm never going to be IBM or any of those other multi business companies based in a million countries, but frankly, let's be grateful for that as we have plenty enough of those to be going on with. Actually, I must say that I think the world would be a little better off to have a few more people making and selling their own items, be it ironwork, jewellery, or foods. The personal touch is where it's at, as far as I'm concerned.


I have to say, for those of you who know me, nope, I'm not back at work yet. It's a pain, not just a pain in the back. I so want to get back to work!!! I saw a nice locum doctor the other day, who was very sympathetic, but what I really want is less sympathy and a bit more action. Still only another two weeks until I get my first physio appointment, and then I'll really be suffering! And also hopefully, a wee bit more mobile.


I made some fabulous biscuits over the weekend. Since I posted my recipe for the Walnut Cookies, I thought I'd add these in - they're very similar, but a bit different, and these spread whilst your cooking. They go very crisp on the cooling tray too, and are extremely yummy.


Peanut Cookies

Set the oven to 190/200 degrees C. (sorry can't do the translations into Farenheit, but it's a medium to hot oven.)

In a large bowl, cream together a tablespoon of smooth peanut butter with an equal quantity of butter, and a tablespoon and a half of icing sugar. Cream until it's light and moderately fluffy - best to start with warm ingrediants here, at least at room temperature, or you could be at this for a while.

When you're happy, add in a couple of the same size tablespoons full of cornflour. This is a bit of a tricky stage, you'll have to start off with the spoon and then maybe start breadcrumbing it after a while. Cornflour is so fine, that it becomes a very sticky mix. Then add a good same size tablespoon or two of ordinary plain flour. Get all of your mix off your spoon, and get in there with the fingers, rubbing it between your finger and thumb to make breadcrumbs - just as if you're making crumble topping. When you've got a bowlful of reasonably fine crumbs, add a couple of handfuls of ordinary roast peanuts, yes, the one's with the salt. I find it a good idea to give them a bit of a shake in the sieve before adding them to get rid of excess salt, but the few grains that cling to the nut itself are great - it makes for a wonderful taste contrast between the sweet biscuit and salty nut. I also added in another tablespoon of caster sugar. Give it a good stir to mix.

Add a tablespoonful of water to the mix. Now I always get my water in a glass and have it by the bowl, if you put the bowl under the tap you risk getting too much water in there. Add enough water to make a sticky mix, but use you're judgement here, you're not looking for cake mix. The correct mix is when you've reached the point that if you put a clean utensil in there, the mixture would stick - but cling to the utensil, not drip off like a cake mix would.

Divide into small dessert spoons full onto a non stick baking tray. From this amount of mixture I got 18 biscuits. I didn't flatten them at all, but I sprinkled more caster sugar over the top of each biscuit. These went into the oven for about 15 minutes, but keep a close eye on them - you're aiming for golden brown, not burnt sienna! And do remember when you take them out, there will be hot sugar, which is incredibly painful if you get it on your fingers. Nuts will burn quickly, so do watch over them. The biscuits will flatten and spread whilst cooking, and you'll need a spatula to take them off the baking sheets - put them on a rack to cool and they'll crisp up wonderfully. And don't be tempted to try them before they're cool - they will be very hot indeed.


So there you go - Peanut Cookies. I used Whole Earth Organic peanut butter, which is ideal for this sort of biscuit. These aren't at all good for you - about the best that can be said is there's a good deal of fibre in these biscuits, but oh it's nice to have a bit of a treat with a cup of tea and the football results. And alas, there aren't going to be that many more Saturdays with football results until we get to September, so make the most of the remains of this season. As an Aston Villa supporter, let me say it was a very good weekend!


Later this week, I'll be doing a project on a twisted wire bangle, that doesn't need any other equipment except wire, beads, and perhaps a pair of pliers to twist the wire armature together. That's ordinary household pliers if you don't have the jewellery kind. I've made one already, but I'll be doing another to photograph as I go along - here's a quick photo of the one that I've already made:


Friday, April 13, 2007

Oh yes, and don't forget to fly on over to Sunspark Sparkles, my new blog for items I have available for sale!

Hello and a big Thanks!

Hi there,
I got my blog count today - there's a meter on this thing that tells me how many people have visited, and a great many statistics that frankly, I can rarely make a great deal of sense of! However, it does tell me where people are - and Wow! I seem to have people reading this from all over the world!
Most of you seem to get here via Flickr, which is brill. It gives me a real buzz to think people are looking at my photos and then coming on over here to - well, I guess find out a bit more about me. I can only hope that you find it interesting enough to come back a time or two! I'm particularly thrilled to find that I've had a few people coming to look at this from China, because China has always been a country that's interested me. Years and years ago there was this tv series on China, a very interesting series of small documentaries on how people lived in China, and it was absolutely fascinating - it was called The Forbidden Kingdom, and it was the sort of thing that once you'd seen one episode of it, you couldn't not watch the next. One thing I remember particularly clearly was how beautiful China is, the mountains and the way the trees grew out at such strange angles. Just gorgeous. So if you're reading this in China, you're very welcome. It's great to have you a bit more out there among the rest of us guys, you deserve to be a bit bigger player on the world stage than you've been in the past. And actually, talking about Chinese television programmes, a very long time ago I also watched a thing called Empress Wu.
There may be some other's over here who remember Empress Wu. It used to be on Channel 4, I think, on Sunday lunchtimes, and was subtitled - Empress Wu did exist, apparently, and was a medieval period empress who was one of the few women to hold power at that time. And of course there were great things on tv about China too, like The Water Margin. Who doesn't remember that, way better than Monkey!
Enough about trash tv series! I can't believe how many people are coming on here, and the places they're from! Lots of people from India, and America - but I have one very special thing I'd like to put on here. You'll know who you are because you've been popping on to this blog for a fair old while now, and you come from Cramlington near Newcastle, I believe. You are like my oldest reader! I would love for you to send me an e mail, it'd be nice to know you! Anyone can if they want to, send it to
sunspark@hotmail.co.uk
and say hello! I promise I don't bite! But you don't have to, we all get shy from time to time. And it's a pretty daunting thing to do, to sort of write to someone you don't really know!
Anyhow guys, thanks so much for being interested enough to read this. I really appreciate it!

Thursday, April 12, 2007

12th April 07 - Big News!

Well hello there!

I have great news for those of you who've seen my crafty makings and thought, I'd like to buy that! But maybe you don't have an Ebay identity and don't fancy going through the hassle of getting one, or you don't know where to find Etsy - whatever!

Now you'll have a chance to buy some of my creations. I've opened a second blog -

http://sunsparksparkles.blogspot.com/

and you can buy anything you fancy on there! Basically if you see something you like, then send me a quick email. I'll pop the item on one side for you, go through the payment methods with you, and remove it from the blog. That item is now yours! As soon as I've received your payment, I'll shoot it off in the post to you!

Why don't you scoot on over there and have a look? I've only got a few items on there right now, but I'll be adding and subtracting as we go along. It's a cool idea for those of you who fancy hand crafted items, and I'll be happy to help you.

Tuesday, April 10, 2007

Tuesday 10th? 11th April

Just back from the old homestead, so have no idea what the date is!!!!
We had a very nice weekend - Jo did very well at the bootsale! Unfortunately, I didn't do so well, but then I couldn't haul the stuff over there - if you have a bad back, you can pretty well kiss active bootsaling goodbye for the duration! Oh dear, exclamation mark disease is making a violent reappearance....
However, I did get a new copy of Wuthering Heights - mine has disappeared somewhere, so now I have a new copy and I've already read the first couple of chapters, so in due course I shall post my thoughts and opinions on it. Bootsales are really the best for replacing those classic books that get lost for the minimum of expenditure.
One very nasty thing happened though - Jo, Ken & I were happily sat down and vegetating in front of the box last night, when we heard that Mum had fallen. You can hear it through the walls - everyone rushed round, and happily, no serious injuries had occurred. And this is were it gets really strange - Jo was sure she'd have a really nasty bruise this morning, but lo and behold, not a trace of one. She's not even complaining of feeling sore! But lord, the first few minutes of when these things happen. You cannot sit over someone 24 hours a day, and not let them take a step for themselves, you have to hope that they can move around a bit for themselves. Well at least, you try to prolong that period of them being able to do so for the longest possible time, but inside you know that it's coming to an end, and that that person will have to be watched and helped 24/7. But you hate the thought of what it will mean - it's another step along the road to loss, and it's the loss of one's private family life, because there will be strangers involved. In fact there are so many implications, it's mind-boggling. There are thoughts and feelings that I haven't even had yet, but I know will be involved in this whole thing. There's other family members and how they think and feel about it. And it's your mother you know? Your mother. Perhaps the most intimate familial relationship outside of a spouse that there is. Such a difficult situation. Still, at least this time, alls well that ends well - not even a bruise. Yet if you'd been there, you'd have been convinced there must have been broken bones, fractures, concussion at the least to judge by the shrieking she sent up! Jo says that she shrieks because she's afraid, she knows she can break and the result of that is the hospital, so she's frightened - ergo she shrieks. And I know exactly how she feels. Those first few seconds back way back when when I was lying on the pavement in town, having gone head over heels - utter terror. What's broken? Can I get up? Who will help? And I'm a relatively fit, reasonably young woman in comparison to my mother. How much greater fear is to come when I'm (God willing) in my late eighties, and I know damn well I can't get up by myself. You can bet I'll be shrieking too.

Friday, April 06, 2007

Friday 6th March

Hi there!

I'm being naughty today. I'm doing everything and anything to put off the start of the hunt for stuff to go to a bootsale - and I'm afraid I couldn't tell you exactly why. I'm quite keen to get some stuff cleared, I could do with a few pennies extra, yet here I am - blogging! Not the sign of the eager bootsaler is it?

Perhaps what's at the root of this is the fact that I just know this is going to give me jip in the back. All that bending and rooting through stuff. Perhaps I'll just stick to the odd few books, and that's that.

I've been making Walnut Cookies. I'm sorry to say I seem to have developed a taste for them - the recipe I've been using is a fairly basic one that I sort of adapt to any sort of cookie, biscuit that I fancy. I put the oven on to about 180 degrees c, break open a pack of walnuts and break them into small pieces - reserving a few whole halves for the tops of the biscuits. Then I spread the broken ones onto a tray and pop them into the oven to toast as the oven heats up - takes about 7 - 10 minutes.

In a bowl, I put a heaped tablespoon of plain flour, a tablespoon of cornflour, a half tablespoon full of icing sugar, and about a third of a tablespoon of butter. I rub this in, as if I was going to make crumble, or pastry. When it's rubbed to the consistency of fine breadcrumbs, I add a tablespoon full of granulated sugar. At this point, throw in the toasted walnuts, and mix them into your 'breadcrumbs'. Then I add some water - put it in a glass to add rather than wafting underneath the tap, it's too easy to put too much water in. If you add it by desert spoon, you'll be able to control it. Then I mix it together using the spoon - you can use a knife if you find it easier. You're looking to make a fairly sticky lump of dough!

Get a couple of baking trays - I use two, because my baking trays are quite small and I reckon to get 6 cookies to a tray. With this type of quantity, I'd expect to get fourteen to sixteen cookies - I put them on the trays using the desert spoon, and it's a sticky mix so I use the tablespoon to force it off the spoon. You can try and flatten them a bit, but I quite like them to be little lumpy buns almost - they're hard to flatten because of the nuts. I put a walnut half on the top, and sprinkle the top of each biscuit with granulated sugar. I find that the golden granulated is the best sort for this recipe, the flavour goes well with walnuts.

You then put the trays in the oven for a good 10 to 12 minutes. Keep an eye on them - you're looking to get a nice golden brown, but not burnt, and the walnuts on the top will roast quickly. That's why I don't put them in to toast with the other nuts at the start of the recipe. Being on the top and uncovered, they'll toast well enough whilst the biscuits are cooking. You'll find that the sugar caramalises as well - when you take them out of the oven, put them on a rack to cool. Sometimes you'll get caramalised sugar on the bottom of the tray and I scoop this up with the palatte knife and drape it across the top of the biscuit. It's scrummy!

You can use whatever nut you like, or you could use fruit. Lemon rind and the juice to mix instead of water is a good one, and in the summer you can use raspberries. In fact, any kind of berry goes well with this. Just make sure that you use the cornflour as well, if you use all ordinary flour they become very tough - don't want to break your teeth there! And whilst I'm thinking of it, if you have left over Easter Eggs, why not break up the chocolate and fling in with some toasted hazlenuts? I shall really have to try that one at some point this weekend!!!

Sunday, April 01, 2007

And a few things on sale in my Ebay shop!


Going on sale over the next week!


Cute and sparkly and still available!


New Silvertone Earrings, going on sale this week!


And this is a lovely small bag charm, amethyst hearts, with a huge split key ring in the shape of a heart, also going on sale over the next couple of weeks.